Visa Application Guide Series: How to Apply for a New Zealand Visitor Visa
Are you a Filipino planning to apply for a New Zealand Visitor Visa? Here are some things you need to know.
Limitations: The Visitor Visa allows you to stay for up to 9 months in New Zealand. This visa also allows you to STUDY for up to 3 months. However, you are NOT ALLOWED TO WORK in New Zealand.
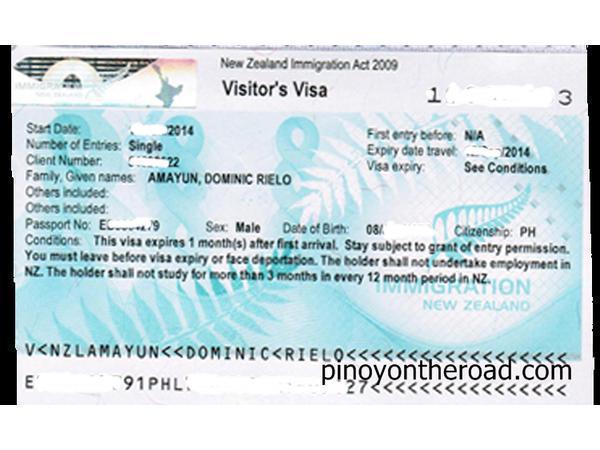
IMPORTANT NOTE: As of January 2018, Immigration New Zealand has started granting electronic visas (eVisas) to those who apply online. You will not have the physical visa sticker on your passport. Rather, you will be sent an approval letter. Make sure you keep a digital copy of this eVisa printout and print at least 3 copies to bring along with you as you travel to New Zealand. Keep it in a plastic bag to make sure that the printed copies are dry and that the ink doesn't fade out.
More of this series: Visa Application Guide
Show All- Visa Application Guide Series: How to Apply for US Tourist Visa (B-1/B-2)
- Visa Application Guide Series: How to Apply for Schengen Short-Term Tourist Visa
- Visa Application Guide Series: How to Apply for a UK Standard Visitor Visa
- Visa Application Guide Series: How to Apply for a New Zealand Visitor Visa
Criteria
With that out of the way, you will need to apply for a Visitor Visa and must meet the following criteria (taken from https://www.immigration.govt.nz/new-zealand-visas/options/visit/explore-visitor-visa-options)
- You must have proof to show that you’re a genuine tourist and you will leave New Zealand at the end of your stay.
- You must have enough money to support yourself in New Zealand. If not, you need to have an acceptable sponsor who must also prove that he/she has enough funds to cover your stay.
- You must have a return ticket (to guarantee that you are going to exit New Zealand)
Documents to Prepare
You will need to prepare the following documents 3-6 months before your intended departure date:
- Original passport. Your passport must have a six-month validity from your expected arrival date in New Zealand. If not, you will need to renew your passport. To schedule for your passport renewal will take time, from 2-6 months, depending on which city/province you are applying in. To set an appointment, click here. Click this link to read more about renewing your Philippine Passport. To date, the earliest available slot in DFA Cebu is in October 2018.
- Confirmed return ticket – not a reservation. That means you need to purchase your ticket to and out of New Zealand. This is a huge gamble, especially if you are unsure if you will be granted a visa. We recommend purchasing the tickets at least 6 months before your intended departure date. Also, choose the flexi option – this means that you can change the date of your departure, or even of your destination.
- Confirmed hotel booking. If you are staying with a friend or your family, you must be able to produce an invitation letter or any proof of their address (bills, tenancy agreement, etc).
- Certificate of Employment / Business Registration Certificate / Enrollment Form. The certificate of employment should state your current position, date when you were hired, and current monthly salary. For students, the official enrolment form will suffice. For business owners, a DTI registration certificate will do. Obtaining a certificate of employment will depend on your company's policy. For some, it will only take less than 24 hours after your request for an employment certificate. For others, especially MNCs with centralized HR systems, it will take up to 1 week. Presumably, business owners, should already have the original registration certificate ready. Students should already have a copy of their enrollment forms on-hand too.
- Proof of Funds. You might be asked to produce your bank statements (last 3 months bank statement), bank certification (latest), copy of your passbook (last 3 months) and other proof of cash. For most banks, especially those who are "preferred" clients, requesting for a bank statement/certification is free, and will only take a few minutes to half a day. For other banks, the processing might take a bit longer -- 3 days at most. If someone else is is providing financial support to you, documents that show they have sufficient resources/funds to shoulder your stay. In addition, you must be able to provide proof of your relationship to that sponsor (e.g. birth certificate - parent; email exchanges among friends, etc)
- ID picture – Check out this video.
- You must be in good health. In the application form, you will be required to disclose any illnesses.
NOTE: Prepare digital copies of all these documents if you opt to apply online.
Mail Your Application or Apply Online?
A. Mailing the Documents
If you are mailing your application, you may download the New Zealand Visitor Visa Application Form here: https://www.immigration.govt.nz/documents/forms-and-guides/inz1017.pdf
Enclose all original documents and their photocopies in a long brown envelope and send it to:
- New Zealand Visa Information and Application Center: Mezzanine Floor Unit M01, Ecoplaza Building, 2305 Chino Roces Avenue Extension, Makati City, Metro Manila 123
We recommend that you use registered mail to be able to track your documents.
You may also refer to the Visitor Visa Guide to help you fill up the form as it tends to be a bit long and rather complicated. You may download the Visitor Visa Guide here: https://www.immigration.govt.nz/documents/forms-and-guides/inz1018.pdf
B. Applying Online
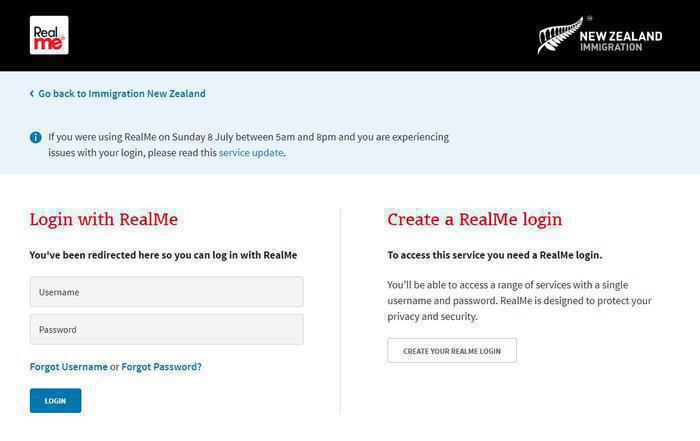
If you opt to apply online (which we recommend), you will first need to create an account in the Immigration NZ portal.
Create your account here: https://www1.logon.realme.govt.nz/cls/logon.logon?cid=1The page will ask for to create your username and password.
- After creating your login, you will be directed to a page where you will need to key in your personal details.
- Before proceeding, you will need to click the verification link sent via your email address. This is to make sure that the email you keyed in earlier is indeed yours.
- Under Applications, choose “Create new visitor visa application”
- When it comes to the question “Do you have a MasterCard or Visa card to pay for your application?”, select “Yes/I am from a fee waiver country”. Filipinos are indeed not required to pay the NZD184 visa fee if you stay there for less than 60 days. But, we will get to that later.
- Get all your necessary documents ready (passport details, etc) so you can fill in all the required information. They will ask about your work, contact information, travel information, health information and etc. Note that you can save your application and finish it at another day. All the fields must be answered in English. Remember to save from time to time, or else you will be logged out after 30 minutes of inactivity.
- Prepare your documents and your ID picture.
- Uploading the documents – we will discuss this in the subsequent section.
- After uploading your documents online, you will receive a confirmation page. PRINT THIS PAGE.
ID Picture
For your ID photo, check out this video for the proper guidelines.
Upload Your Documents
In the last few steps, you will be asked to upload digital copies of your documents (see earlier note on preparing digital copies).
These are the documents that you will need to upload:
Must be in JPG File:
- ID picture / passport-sized photo
Must be in PDF Files:
- Passport details page (the one with your personal details)
- Supporting documents – proof of funds, etc.
- Certificate of employment
- Confirmed return travel tickets
- Confirmed hotel booking
If you don't know how to convert JPG (scanned images) to PDFs, here's an easy tip:
- Paste your JPG scanned image to MS Word
- Save as PDF / Print to PDF
If your PDFs are too large, follow these steps:
- Go to this link https://smallpdf.com/compress-pdf.
- Open the folder with the PDFs that you want to resize.
- Click and drag the PDF to the "Drop PDF here" icon.
- After it finishes processing, click Download File Now.
- Select a saving location.
- Click Save.
Make an Appointment with VFS Global
Submit your confirmation page together with your passport to VFS. You can do this as a walk-in at the following locations and during the following times:
Manila
VFS Global Services Philippines Private Inc. at Mezzanine Floor Unit M01, Ecoplaza Building, 2305 Chino Roces Avenue Extension Makati City, Metro Manila 1231
Mondays to Fridays, except for holidays, from 7:00 AM to 2:00 PM (Manila)
Cebu
VFS Global Services Philippines Private Inc. at 9th Floor, Keppel Center, Unit 905, Samar Loop cor. Cardinal Rosales Avenue, Cebu Business Park, Cebu City 6000
Mondays to Fridays, except for holidays, from 7:00 AM to 1:00 PM (Cebu)
Or you can wait for the email from the immigration officer informing you of the documents that you need to submit to VFS. We suggest waiting for the email.
If you prefer not to submit your documents yourself at the VFS addresses mentioned above, you can also opt for the following alternatives:
- Submit via a Representative. For this you will need to provide an authorization with photocopies of 2 of your government-issued IDs. Your representative must have an ID with him/her as well.
- Submit via a Courier. You can send your passport via DHL or 2Go, or via the NZVAC or New Zealand Visa Application Center’s courier service. NZVAC will be able to pick it up from your home for P380. If you prefer the courier to deliver your passport back to you, they offer a two-way delivery service for P600: here.
Electronic devices, other than your mobile phone, are not allowed inside VFS so we suggest you leave them at home. Tell your authorized representative too.
Fees
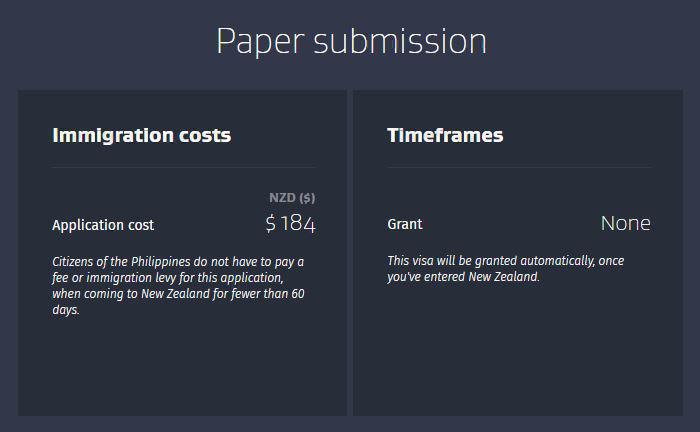
Filipinos do not have to pay the NZD 184 fee if we intend to stay less than 60 days in New Zealand. If you plan to stay more than that, then you will have to pay the fee.
However, this does not mean that you don’t have to shell out any amount. You will be required to pay VFS (not Immigration New Zealand) for the handling of your application as an authorized third party. Some of the services are optional.
- P570 per application for visa handling
- P110 per application for SMS services (optional – if you want to receive SMS alerts regarding the stage your application is in)
- P380 per application for courier return fee (optional – if you cannot pick up your passport and visa)
Payment can either be in cash, credit card (MasterCard or Visa) or bank transfer. Note that for bank transfers, you will be charged additional bank fees. To learn more about bank transfer, click here: http://www.vfsglobal.com/NewZealand/Philippines/pdf/Payment-Method-Instruction.pdf
Remember to keep the receipt. Save a digital copy of your receipt too (just take a picture of the receipt if you paid over the counter and save it to your phone).
Processing Time
Your visa will be processed within 20 days, depending on your documents and on the number of applications processed within a period. We've heard of some who got their visas in less than 5 days though.
When you finally receive the SMS and/or email regarding your passport pick up, do note that VFS Cebu only allows passport pick up from 1:00PM to 4:00PM from Mondays to Fridays; while VFS Manila allows pick up from 2:00PM to 4:00PM from Mondays to Fridays.
More of this series: Visa Application Guide
Show All- Visa Application Guide Series: How to Apply for US Tourist Visa (B-1/B-2)
- Visa Application Guide Series: How to Apply for Schengen Short-Term Tourist Visa
- Visa Application Guide Series: How to Apply for a UK Standard Visitor Visa
- Visa Application Guide Series: How to Apply for a New Zealand Visitor Visa
Visa Application Guide Series: How to Apply for a UK Standard Visitor Visa
Continue reading...
Visa Application Guide Series: How to Apply for US Tourist Visa (B-1/B-2)
Continue reading...